Running Workflows Tutorial
Introduction
Once you have a working installation of atomate, you’ll want to jump in and start running workflows. There are preset workflows with reasonable settings for many calculations. This tutorial will quickly guide you through customizing and running a preset workflow to calculate the bandstructure of MgO.
Objectives
Run an atomate preset workflow using Python
Analyze the results using pymatgen
Prerequisites
In order for you to complete this tutorial you need
A working installation of atomate
A text editor
Bandstructure Workflows
A fundamental and common use of DFT is to calculate bandstructures and electronic densities of states for materials. Here we will use a preset workflow to calculate the bandstructure. A schematic of the workflow is below. First, the structure is optimized and a selfconsistent static calculation is performed. Then non-selfconsistent static calculations are completed with k-points on a path (for bandstructures) and k-points uniformly sampling the Brillouin zone.
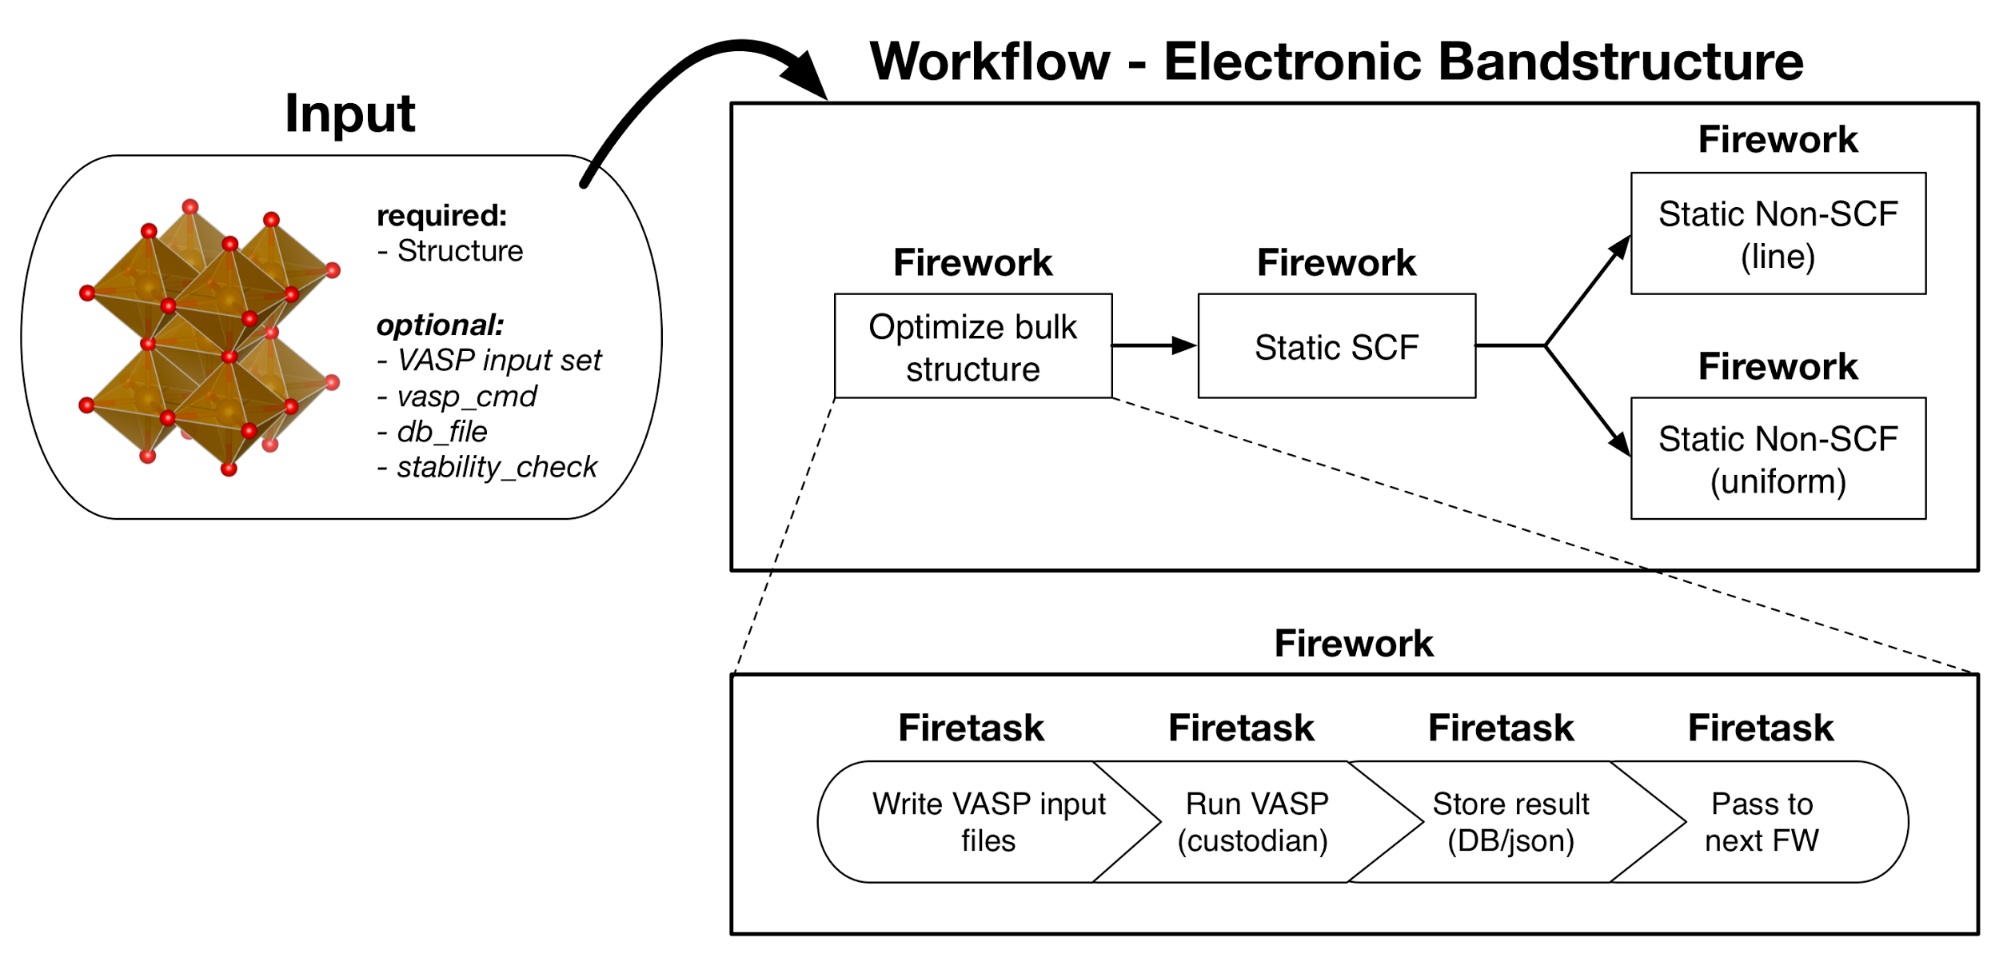
Atomate bandstructure workflow. An optimization and static calculation followed by uniform and line non-selfconsistent calculations.
Running a Bandstructure Workflow
Setup
Make sure you have completed the installation tutorial. Next, create a folder on your HPC resource for this tutorial. It can be located anywhere. You’ll keep all of the files for this tutorial there.
If you do not already have important prior results in your atomate environment, start fresh by running:
lpad reset
Warning
This will reset all of your previous Fireworks and Workflows in your LaunchPad. Do not do this if you have actual results that you want to keep!
If you do not or want to reset your LaunchPad, you can set up a different database to use for tutorials or simply accept mixing your previous results and workflows with the contents of this tutorial in your database.
Create the structure
In your text editor, create a file called POSCAR and enter the following text for a MgO structure:
Mg1 O1
1.0
2.606553 0.000000 1.504894
0.868851 2.457482 1.504894
0.000000 0.000000 3.009788
O Mg
1 1
direct
0.500000 0.500000 0.500000 O
0.000000 0.000000 0.000000 Mg
Note that this does not have to be a POSCAR. You can also supply multiple formats supported by pymatgen, including: Crystallographic Information File (CIF), POSCAR/CONTCAR, CHGCAR, vasprun.xml, CSSR, Netcdf and pymatgen’s JSON serialized structures.
There are many thousands of structures available from the Materials Project that can be run directly in atwf or by creating Structure objects with pymatgen’s MPRester.
There are multiple ways of defining the workflow to execute on the structure. We’ll go over 3 options.
Option 1: Use a pre-defined workflow in atomate
Atomate includes many pre-defined workflows - some defined as YAML files and others as Python functions. Pre-defined YAML files are in atomate.vasp.workflows.base.library. You can add them using the command:
atwf add [[STRUCTURE_FILE]] -l vasp -s [[NAME_OF_FILE]]
where [[STRUCTURE_FILE]] is your POSCAR file (or cif, etc.) and [[NAME_OF_FILE]] is the name of the workflow file. Here you would use bandstructure.yaml.
The Python function presets are defined in atomate.vasp.workflows.presets. You can add such workflows using the command:
atwf add [[STRUCTURE_FILE]] -p [[NAME_OF_PYTHON_FUNCTION]]
An example of a valid Python functions in atomate.vasp.workflows.presets is wf_bandstructure. However, this isn’t exactly the procedure we’ll follow next, so to continue with this example, let’s choose one of the other two options for defining the workflow which are more custom than the presets. However, note that you can and are encouraged to use preset workflows where practical and that there exist many such workflows for you to choose from.
Option 2: Create your own workflow file
You can use a text editor to define your own workflow that chains together pre-defined steps in atomate.
The Workflow and its Fireworks are encoded in the YAML format. The pre-defined YAML files at atomate.vasp.workflows.base.library would make good starting points for YAML workflows.
Since there is already one defined for a bandstructure, it is not necessary to do this here.
The main benefit of creating custom YAML workflows is to be able to share them with non-programmers and run them on any structure file or any one of the many structures from the Materials Project.
For most non-trival workflows, it is better and often less verbose to use Python to construct the workflows.
Option 3: use Python to generate and add the workflow
The YAML version above is more efficient and clear to read and modify than a typical shell script to set up and run these calculations by hand. Even so, this workflow would have been tedious to type out rather than copy-paste. There must be a better way! Enter Python.
In the installation tutorial, you set up your FW_config.yaml, you indicated the atomate Fireworks can be found at atomate.vasp.fireworks.
Similarly, atomate preset workflows can be imported from atomate.vasp.workflows.presets.core,
which thinly wraps the base workflows (atomate.vasp.workflows.base) allowing for common settings to be changed with configuration dictionaries.
We can setup the workflow and add it to our LaunchPad ready to run in just a few lines of Python.
Create the workflow script
In the same directory as the POSCAR, create a Python script named mgo_bandstructure.py with the following contents:
# Create a bandstructure from the workflow from the atomate presets
import numpy as np
from pymatgen.core import Structure
from fireworks import LaunchPad
from atomate.vasp.workflows.presets.core import wf_bandstructure
from atomate.vasp.powerups import add_modify_incar

# load structure from file
struct = Structure.from_file('POSCAR')  # note: many file formats supported, see function docs

# create the Workflow
wf = wf_bandstructure(struct)

# finally, instatiate the LaunchPad and add the workflow to it
lpad = LaunchPad.auto_load() # loads this based on the FireWorks configuration
lpad.add_wf(wf)
Add workflow to LaunchPad
If you want to add the workflow to your LaunchPad (e.g., you didn’t already go through Option 2 for adding a workflow): from the folder with your POSCAR and mgo_bandstructure.py, run the Python script:
python mgo_bandstructure.py
Running the workflow
Running the workflow with the following command will submit a single job to the batch queue configured in my_qadapter.yaml.
The job will launch Fireworks from your LaunchPad until all of them have completed or you run out of walltime.
This workflow will likely on the order of an hour, depending on your cluster configuration.
qlaunch singleshot
As the workflow is running, you can check the status with lpad get_wflows.
Once all workflows have finished, you can check that the jobs are completed with lpad get_wflows and/or go to the output files from the batch job (*.out and *.error) at the launch directories to make sure everything went well.
Unless there were any errors, the Fireworks have successfully finished launching and running, the results should be added to your database and you can move on.
Analyzing a Bandstructure Workflow
Finally, we’ll plot the results that we calculated.
Simply add the following Python script (bs-analysis.py) to your folder, change the ``PATH_TO_MY_DB_JSON`` to the path to your ``db.json`` file (e.g. <<INSTALL_DIR>>/config/db.json), and run the script.
from atomate.vasp.database import VaspCalcDb
from pymatgen.electronic_structure.plotter import DosPlotter, BSPlotter
# create the atomate db from your db.json
PATH_TO_MY_DB_JSON = '/path/to/my/db.json'
atomate_db = VaspCalcDb.from_db_file(PATH_TO_MY_DB_JSON)
# get the uniform bandstructure entry from the database and
# use the get_dos method of the database to get the pymatgen CompleteDOS for that task id
uniform_bs_entry = atomate_db.collection.find_one({'task_label': 'nscf uniform', 'formula_pretty': 'MgO'})
complete_dos = atomate_db.get_dos(uniform_bs_entry['task_id'])
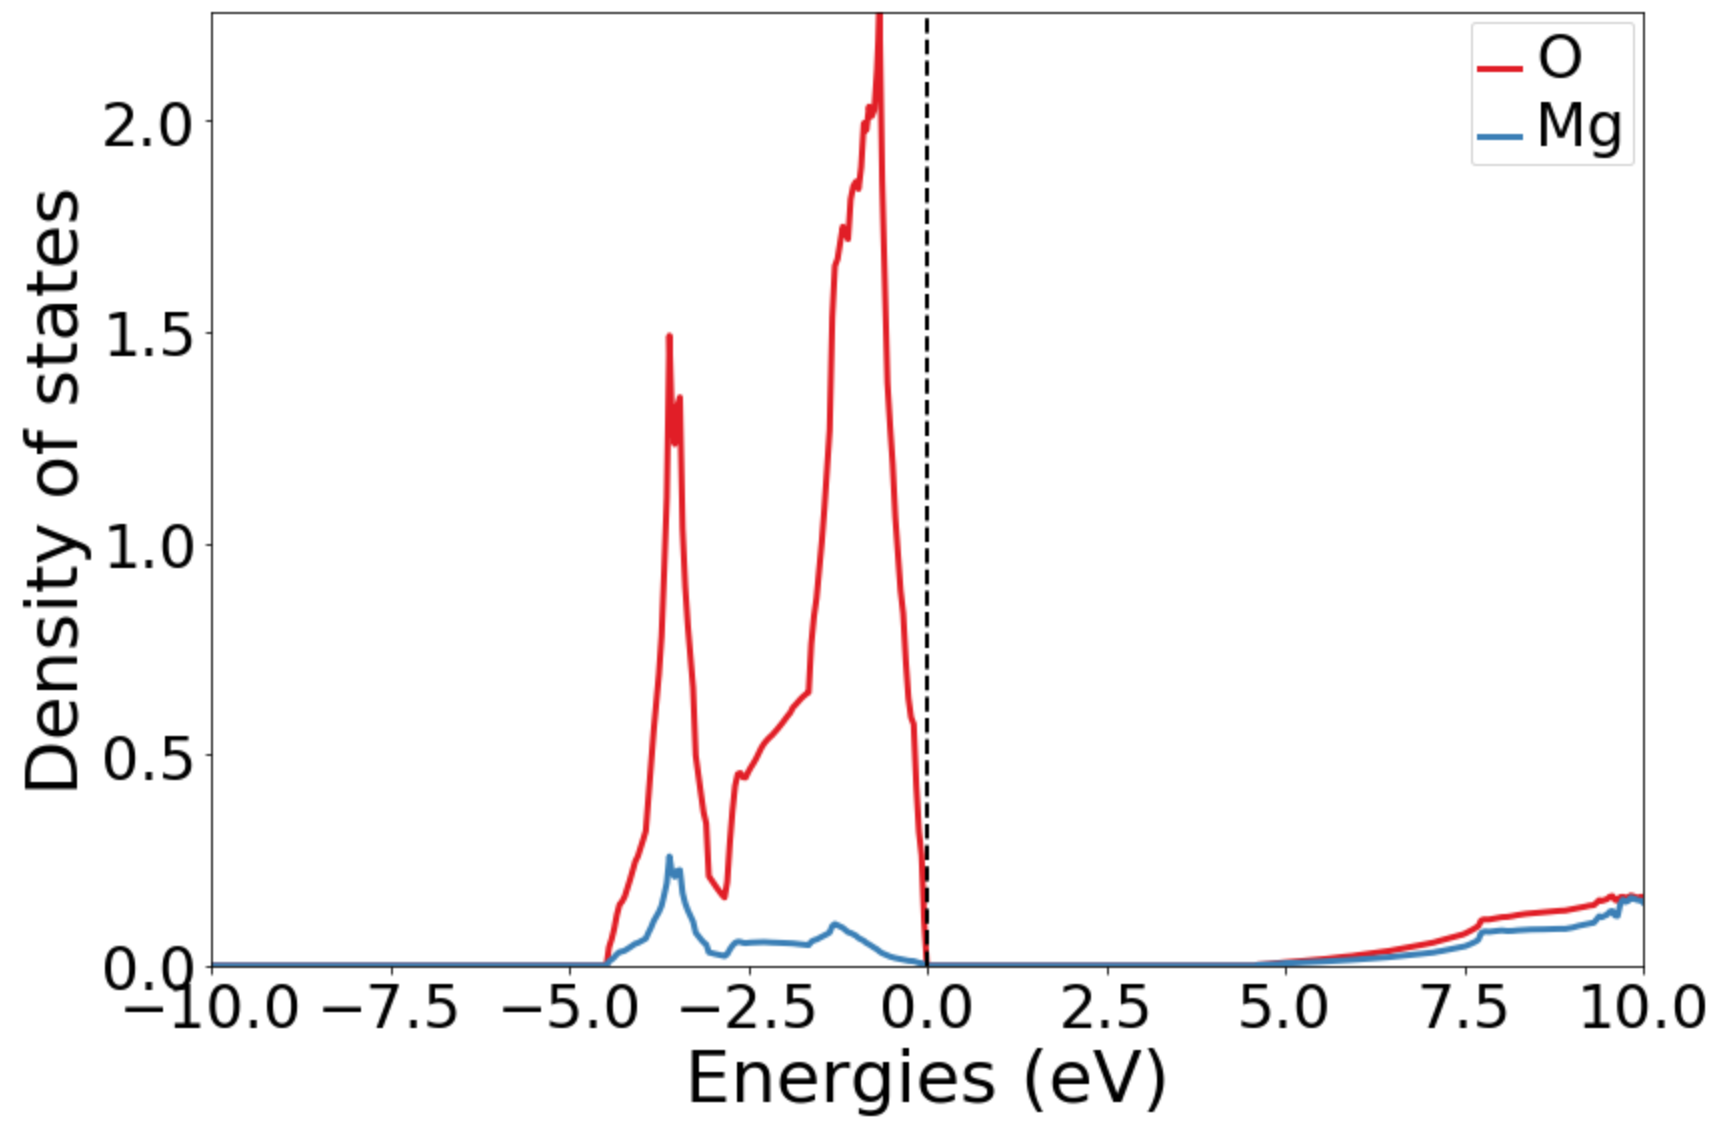
# Instatiate a DosPlotter and plot the DOS.
# Comment out the get_plot and uncomment save_plot if you have no GUI frontend to plot to.
dos_plotter = DosPlotter()
dos_plotter.add_dos_dict(complete_dos.get_element_dos())
dos_plotter.get_plot(xlim=(-10, 10))
#dos_plotter.save_plot('MgO-dos.pdf', img_format='pdf', xlim=(-10, 10))
# print the Fermi energy and bandgap from the DOS:
print('Fermi energy: {} eV'.format(complete_dos.efermi))
print('Bandgap: {} eV'.format(complete_dos.get_gap()))
# get the entry from the database and
# use the get_band_structure method of the database to get the pymatgen BandStructureSymmLine for that task id
line_bs_entry = atomate_db.collection.find_one({'task_label': 'nscf line', 'formula_pretty': 'MgO'})
bandstructure = atomate_db.get_band_structure(line_bs_entry['task_id'])
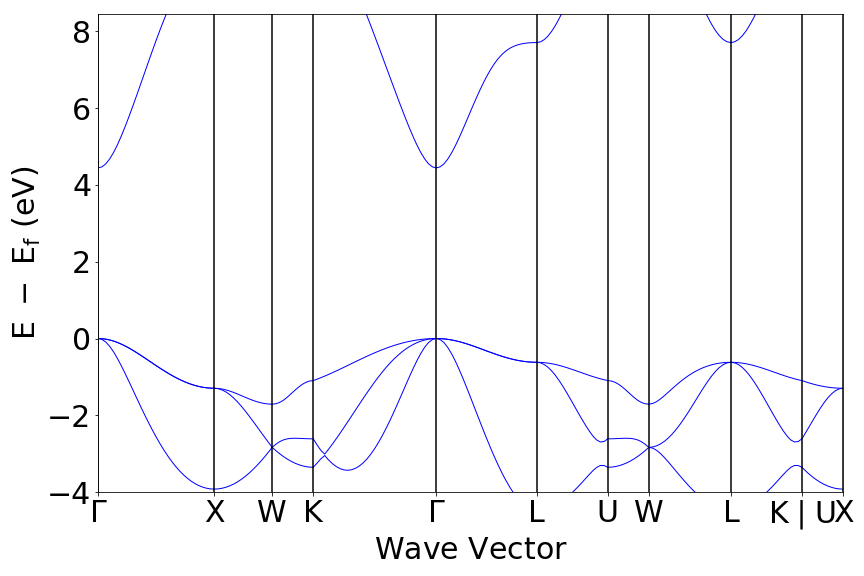
# Instatiate a bandstructure plotter and plot the bandstructure.
# You can uncomment out the get_plot if you have a GUI frontend to plot to.
bs_plotter = BSPlotter(bandstructure)
bs_plotter.get_plot()
# bs_plotter.save_plot('MgO-bandstructure.pdf', img_format='pdf')
If you open the saved figures, you should see a plot of your DOS and bandstructure!
Conclusion
In this tutorial you learned how run a workflow from in a YAML file without writing any code and to do the same in Python.
To see what preset workflows can be run, see the documentation that includes them at atomate.vasp.workflows.presets. They can be set up the same way as in this tutorial.
At this point, you might:
Try another example: running a Gibbs free energy workflow: Running Gibbs Workflows.
Skip to exploring how to use builders to generate metadata: Builders: creating calculation reports for data analysis.
Skip to learning how to create your own workflows that you can use and distribute: Creating Workflows.